Sunday, April 14, 2019

Display Out of Stock Products on a separate page

Show out of stock products on a separate page.

Add the below PHP to your theme functions.php file (I always recommend to create a child theme).

Use the shortcode [out_of_stock_products] on any page you like.

Note – all products must be set to “Manage Stock”

1. How to create WooCommerce shortcode.
2. How to use a WordPress query to return those products that have 0 stock.


1:  /* Display All Out of Stock Products via a Shortcode - WooCommerce */  
2:  add_shortcode( 'out_of_stock_products', 'wpsohel_out_of_stock_products_shortcode' );  
3:  function wpsohel_out_of_stock_products_shortcode() {  
4:  global $product, $woocommerce, $woocommerce_loop;  
5:  $columns = 4;  
6:  $args = array(  
7:    'post_type'       => 'product',  
8:    'post_status'      => 'publish',  
9:    'meta_query'      => array(  
10:      array(  
11:        'key'      => '_stock',  
12:        'value'     => 1,  
13:        'compare'    => '<'  
14:      )  
15:    )  
16:  );  
17:  $loop = new WP_Query($args);  
18:  ob_start();  
19:  woocommerce_product_loop_start();  
20:  while ( $loop->have_posts() ) : $loop->the_post();  
21:  wc_get_template_part( 'content', 'product' );  
22:  endwhile;   
23:  woocommerce_product_loop_end();  
24:  woocommerce_reset_loop();  
25:  wp_reset_postdata();  
26:  return '<div class="woocommerce columns-' . $columns . '">' . ob_get_clean() . '</div>';  
27:  }  

Saturday, February 3, 2018

Build WordPress eCommerce store by WooCommerce

Creative and technical WordPress WooCommerce expert building rich and interactive eCommerce online store by WordPress WooCommerce with 4 years of experience.

If you are looking for eCommerce website by WordPress then you are in the right place.

I build with the latest technology which will accelerate the development process, with the best security and responsive design.

Services I am offering:
✓ Install Wordpress
✓ Setup Google analytics
✓ WooCommerce Setup & Settings update
✓ Upload Product with the variation
✓ Theme Customization
✓ Responsive with mobiles & tablets on all browsers
✓ Slider at Top
✓ All payment methods available & payment integration
✓ Live Chat
✓ Subscriber Form Sign Up
✓ Coupon System
✓ Transfer site to another hosting if necessary
✓ Integrate Social Plugins. etc...

Why me : 
✓ Free 1 month support
✓ The quickest website delivery
✓ Unlimited revision until complete project
✓ Top communication service
✓ 100% Customer Satisfaction

https://www.fiverr.com/s2/cb2f5dc668

Saturday, January 13, 2018

WordPress Social Login | WooCommerce Social Login | Create Facebook App | Get Facebook App ID and Secret Key.

For adding a Facebook Login button in WordPress follow this article. I will show you how to add one-click registration and login with Facebook in WordPress. I used Nextend Facebook Connect plugin. Upon activation, go to "Settings > Nextend FB Connect" to configure the plugin App ID and App Secret Key.


Step One : 

Log into your Facebook account. Go to developers.facebook.com  “My Apps > Add a New App > Enter App Name + Email Address > Create App ID > complete captcha test > Submit” 


Step Two : 


Choose “Facebook Login > Set Up > Select the platform > Enter Site URL > Save”


Step Three : 


Go to "Settings > Basic > App Domains > Privacy Policy URL > Terms of Service URL > Choose Category > Save changes"


Step Four : 


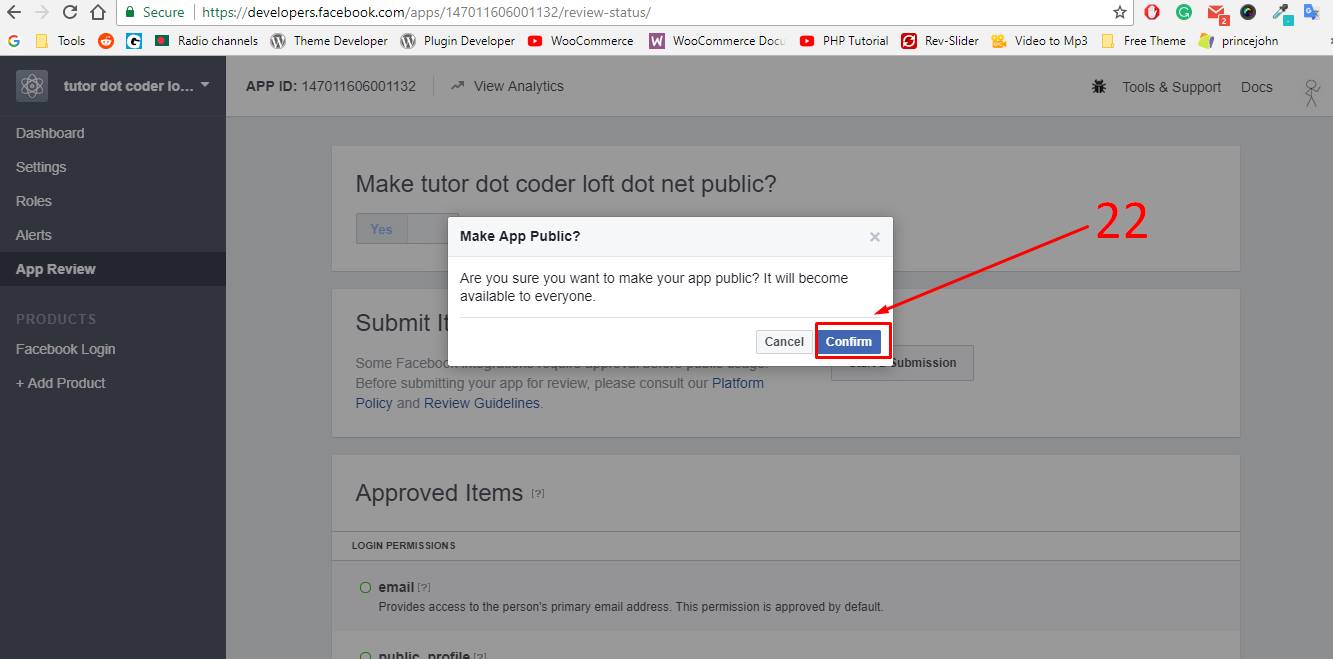
Go to "App Review > Make Your app public" 


Step Five : 


Again Go to "Settings > Basic and I recommend to copying your App ID and App Secret key.


Step Six : 

Go to "Products > Facebook Login > Settings > Enter your website URL in the OAuth URIs field > Save changes 


 You’re done!  and you may ignore the other settings, may not necessary for you. 


Thursday, September 21, 2017

How To Create A Simple PHP Contact Form : Create Forms Using HTML & PHP

A contact form on your site allows visitors to communicate with the site owner. In this post, I build a Simple PHP Contact Form to process your contact form data in just a few steps below. 


Step 1: Create a  "form.html"  file then copy and paste the demo code below I have provided


1:  <!DOCTYPE html>  
2:  <html lang="en">  
3:  <head>  
4:       <meta charset="UTF-8">  
5:       <title>PHP Contact Form</title>  
6:       <link rel="stylesheet" href="style.css">  
7:  </head>  
8:  <body>  
9:   <div class="container">  
10:         <form id="contact" action="send.php" method="POST">  
11:         <h3>Contact Us</h3>  
12:         <fieldset>  
13:          <input name="name" placeholder="Full Name" type="text" required>  
14:         </fieldset>  
15:         <fieldset>  
16:          <input name="email" placeholder="Email Address" type="email" required>  
17:         </fieldset>  
18:          <fieldset>  
19:          <input name="phone" placeholder="Phone Number (optional)" type="tel">  
20:         </fieldset>  
21:         <fieldset>  
22:          <input name="subject" placeholder="Subject (optional)" type="text">  
23:         </fieldset>  
24:         <fieldset>  
25:          <textarea name="msg" placeholder="Type your message here..." required></textarea>  
26:         </fieldset>  
27:         <fieldset>  
28:          <input name="submit" type="submit" value="Send Message">  
29:         </fieldset>  
30:    </form>  
31:   </div>  
32:  </body>  
33:  </html>  


Step 2: Create a  "style.css"  file then copy and paste the demo code below I have provided :

1:  @import url(https://fonts.googleapis.com/css?family=Roboto:400,300,600,400italic);  
2:  * {  
3:   margin: 0;  
4:   padding: 0;  
5:   box-sizing: border-box;  
6:   -webkit-box-sizing: border-box;  
7:   -moz-box-sizing: border-box;  
8:   -webkit-font-smoothing: antialiased;  
9:   -moz-font-smoothing: antialiased;  
10:   -o-font-smoothing: antialiased;  
11:   font-smoothing: antialiased;  
12:   text-rendering: optimizeLegibility;  
13:  }  
14:  body {  
15:   font-family: "Roboto", Helvetica, Arial, sans-serif;  
16:   font-weight: 100;  
17:   font-size: 12px;  
18:   line-height: 30px;  
19:   color: #777;  
20:   background: #FE5E00;  
21:  }  
22:  .container {  
23:   max-width: 400px;  
24:   width: 100%;  
25:   margin: 0 auto;  
26:   position: relative;  
27:  }  
28:  #contact input[type="text"],  
29:  #contact input[type="email"],  
30:  #contact input[type="tel"],  
31:  #contact textarea,  
32:  #contact input[type="submit"] {  
33:   font: 400 12px/16px "Roboto", Helvetica, Arial, sans-serif;  
34:  }  
35:  #contact {  
36:   background: #F9F9F9;  
37:   padding: 25px;  
38:   margin: 150px 0;  
39:   box-shadow: 0 0 20px 0 rgba(0, 0, 0, 0.2), 0 5px 5px 0 rgba(0, 0, 0, 0.24);  
40:  }  
41:  #contact h3 {  
42:   display: block;  
43:   font-size: 30px;  
44:   font-weight: 300;  
45:   margin-bottom: 20px;  
46:   text-align: center;  
47:  }  
48:  fieldset {  
49:   border: medium none !important;  
50:   margin: 0 0 10px;  
51:   min-width: 100%;  
52:   padding: 0;  
53:   width: 100%;  
54:  }  
55:  #contact input[type="text"],  
56:  #contact input[type="email"],  
57:  #contact input[type="tel"],  
58:  #contact textarea {  
59:   width: 100%;  
60:   border: 1px solid #ccc;  
61:   background: #FFF;  
62:   margin: 0 0 5px;  
63:   padding: 10px;  
64:  }  
65:  #contact input[type="text"]:hover,  
66:  #contact input[type="email"]:hover,  
67:  #contact input[type="tel"]:hover,  
68:  #contact textarea:hover {  
69:   -webkit-transition: border-color 0.3s ease-in-out;  
70:   -moz-transition: border-color 0.3s ease-in-out;  
71:   transition: border-color 0.3s ease-in-out;  
72:   border: 1px solid #aaa;  
73:  }  
74:  #contact textarea {  
75:   height: 100px;  
76:   max-width: 100%;  
77:   resize: none;  
78:  }  
79:  #contact input[type="submit"] {  
80:   cursor: pointer;  
81:   width: 100%;  
82:   border: none;  
83:   background: #FE5E00;  
84:   color: #FFF;  
85:   margin: 0 0 5px;  
86:   padding: 10px;  
87:   font-size: 15px;  
88:  }  
89:  #contact input[type="submit"]:hover {  
90:   background: #E54801;  
91:   -webkit-transition: background 0.3s ease-in-out;  
92:   -moz-transition: background 0.3s ease-in-out;  
93:   transition: background-color 0.3s ease-in-out;  
94:  }  
95:  #contact input:focus,  
96:  #contact textarea:focus {  
97:   outline: 0;  
98:   border: 1px solid #FE5E00;  
99:  }  
100:  ::-webkit-input-placeholder {  
101:   color: #888;  
102:  }  
103:  :-moz-placeholder {  
104:   color: #888;  
105:  }  
106:  ::-moz-placeholder {  
107:   color: #888;  
108:  }  
109:  :-ms-input-placeholder {  
110:   color: #888;  
111:  }  


Step 3: Create a  "send.php"  file then copy and paste the demo code below I have provided. Make sure replace my sample email address with site owner email address to receive an email from the visitor.


1:  <?php   
2:  if ( isset($_POST['submit']) ) {  
3:       $f_name = $_POST['name'];  
4:       $e_mail = $_POST['email'];  
5:       $phone_n = $_POST['phone'];  
6:       $subject = $_POST['subject'];  
7:       $msg_b = $_POST['msg'];  
8:       $message = "Name : " . $f_name . " <br/><br/>";  
9:       $message .= "E-mail : " . $e_mail . " <br/><br/>";  
10:       $message .= "Phone : " . $phone_n . " <br/><br/>";  
11:       $message .= "Subject : " . $subject . " <br/><br/>";  
12:       $message .= "Message Body : " . "<br/>".$msg_b;  
13:       $header = "From: " . $e_mail . "\r\n";  
14:       $header .= "Reply-To: " . $e_mail . "\r\n";  
15:       $header .= "Content-Type: text/html";  
16:       $success = mail("contactsohelrana@gmail.com", $subject, $message, $header);  
17:       if ( isset($success) ) {  
18:            echo "<h1>Thank you for your message. It has been sent.</h1>";  
19:       }else{  
20:            echo "<h1>There was an error trying to send your message. Please try again later.</h1>";  
21:       }  
22:  }else{  
23:       echo "<h1>Silence is golden.</h1>";  
24:  }  
25:  ?>  


Step 4:   "Run It"   Run your form by opening your browser :

Wednesday, May 24, 2017

Increase the WordPress Maximum Upload File Size and PHP Memory Limit in WordPress

Depending on the web hosting company you choose and the package you select, each of you will see maximum file upload limit on your Media Uploader page in WordPress. For some it is as low as 2MB which is clearly not enough for media files like (audio / video). Most pictures are under 2MB, so it is fine for just pictures. 


Follow this below step to increase the maximum file upload size in WordPress.

 1.  Log In to your cPanel and find out the "File Manager" Go to "public_html" 

 2.  Create or Edit an existing PHP.INI file


In most cases, if you are on a shared host, you will not see a php.ini file in your directory. If you do not see one, then create a file called php.ini file. In that file add the following code:


   upload_max_filesize = 64M
   post_max_size = 64M
   memory_limit = 3000M
   file_uploads = On
   max_execution_time = 3000
 
 3.  If you are using GoDaddy then follow this below step again, Go to the cPanel  


 4.  Kill PHP Processes


 5.  You are done, go to your Media Uploader page in WordPress 


 Note:  It may not work with some shared hosts in which case you would have to ask your hosting service provider for support. I am using GoDaddy, and GoDaddy is more than helpful when it comes to issues like this.


Thursday, January 19, 2017

How to Download & install Sublime Text and install Zen Coding (emmet) for Sublime Text


 ** How To Install Sublime Text 2 ** 


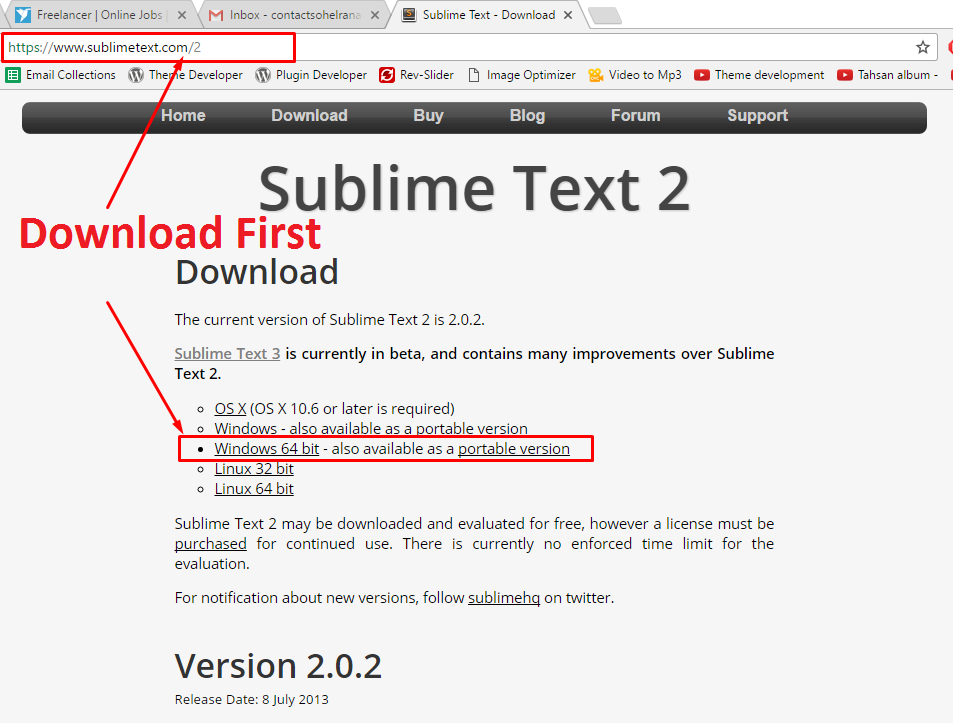
Download Sublime Text 2 → https://www.sublimetext.com/2


1. Double-click on the file that was downloaded. You should see something similar a popup window. You may have a question asking do you want to allow this app to make changes to your device?  Click "Yes"


2. Click "Next" on the Welcome window.


3. Choose the destination and Click "Next".


4. Click "Next"


5. Ready to Install on your destination location Click "Install"


6. After complete installation, Click "Finish".


 ** How To Install Zen Coding In Sublime Text 2 ** 


Copy Package Control appropriate Python code →  https://packagecontrol.io/installation#st2


The console is accessed via the  view > Show Console  menu. Once open, paste the appropriate Python code for your version of Sublime Text 2 into the console, Click "Enter".


This code creates the Installed Packages folder for you. Restart sublime text before going step - 4


Type Package Control or Install Package 


Type "Emmet" and click on "Emmet Zen Coding for sublime text" 

DONE


Happy coding! Code is Poetry!

Wednesday, January 18, 2017

How To Install Notepad++ & How To Install Zen Coding In Notepad++


 ** How To Install Notepad++ ** 


Download Notepad++ → https://notepad-plus-plus.org/download/


1. Double-click on the file that was downloaded. You should see something similar a popup window. You may have a question asking do you want to allow this app to make changes to your device?  Click "Yes"

2. Select English as the language and Click "OK".

3. Click "Next" on the Welcome window.

4. Click "I Agree" on the license agreement.

5. Choose the destination and Click "Next".

6. Choose components (just use defaults). There is no need to change anything. Click "Next".


7. Check the box to add a shortcut to your desktop. Otherwise, do not change anything. Click "Install".

8. After complete installation, Click "Finish".


 ** How To Install Zen Coding In Notepad++ ** 


Download Zen Coding Plugin → https://code.google.com/archive/p/zen-coding/downloads


After download the Zen Coding Plugin zip folder. Unzip the plugin folder and everything copy into your notepad++ plugins directory. 


Restart notepad++ if it’s currently opened. You will find a new menu Zen Coding at the menu bar.


Happy coding! Code is Poetry!

Monday, December 12, 2016

Change the WooCommerce thank you page text – after complete order thank you page

Easily change the text on the WooCommerce thank you page without editing template or plugin files.


WooCommerce thank you page default text is, “Thank you. Your order has been received.” 


Lets you change it easily. Copy this below code in your theme functions.php file.


 <?php  
  /**   
  * change the text on the WooCommerce thank you page   
  * @link https://wpsohel.blogspot.com   
  */  
  function wpsohel_order_complete_tnx_msg( $text, $order ) {  
      $new = $text . 'Thank you for your wellness purchase! Your order has been received and will be delivered to you shortly. If you have any questions, please don’t hesitate to ask. and will be happy to assist you in any way we can.';  
      return $new;  
  }  
  add_filter('woocommerce_thankyou_order_received_text', 'wpsohel_order_complete_tnx_msg', 10, 2 );  
 ?>  

Sunday, October 16, 2016

Transfer files server to server within few second using simple PHP functions

If you frustrated to transfer the big size of files from your old server to new server. You can use this simple PHP script to move files from one server to your destination server within few second.


Simply create a .php file in the destination server and load the file once in your browser.


For example: Create a file in your destination directory "file.php" and in "files.php" add this PHP code. finally run your file via browser like URL "http://destination-url/file.php"


 <?php  
   /**  
   * Transfer Files Server to Server using PHP fopen  
   * @link https://wpsohel.blogspot.com  
   */  
   set_time_limit(0); //Unlimited max execution time  
   $file_name = 'backup.zip'; //New file name  
   $url = 'http://www.wordpress.org/latest.zip'; //Source file URL. Need to change with your URL  
   $copy = file_put_contents($file_name, fopen($url, "r")); //Transfer the file from source url to destination server  
   //notice for success/failure   
   if ( !$copy ){  
    echo 'Ops! Failed, You may check source file URL or <a target="_blank" href="http://wpsohel.blogspot.com/p/contact.html">Need help?<a>';  
   }else {  
    echo 'WOW! Success';  
   }  
 ?>  

After you import/export the file, always delete the PHP file you use to do this task to prevent other people using it.


I hope it's useful for you a simple way to move files from server to server. 


This way you can transfer Website  from old server to new server within few moment. 

Thursday, September 15, 2016

Imagine if tree gave off WIFI signals. we would be planting so many trees and we'd probably save the plant too. Too bad they only produce the oxygen we breathe !

A plant has a life but most often we just view it as an object. A plant is also an idea of a beautiful tomorrow filled with clean air.


So why aren't people planting more trees? The main reason is probably that they are relatively slow growing. But so what? There are the easiest of all the trees to plant because you don’t have to lug a heavy tree home from the nursery, dig a big hole, heave the tree into the hole, and deal with all the other issues attendant with planting a tree, along with the expense of the tree itself.


Friday, September 2, 2016

Tips on WPsohel, How to increase WordPress Website Performance. Speed up WordPress Website loading time.

Website speed really matters. No matter whether it is driven by a WordPress script or on any other, you need to take care of average page load time to keep your visitor happy.

BIG impact, when Google's Matt Cutts announced that slow performing Websites would soon be penalized in search rankings as well.


 The following methods will help you to :- 

      ✓  Optimize WordPress to PageSpeed Insights.
      ✓  Speed up your server.
      ✓  Decrease page load time.
      ✓  Provide an overall better user experience for :

              •  You 
              •  Your users
              •   And search Engines

All of these methods can be and should be used together !

 #1.  Check  WordPress performance with three powerful tools 

              •  Web performance tools at Google
              •  GTmetrix website performance test
              •   Pingdom Website speed test

 #2.  Compress Images 

              •   Compressing your images doesn't always lead to poorer quality 
              •   There is two type of image compression 
                   Lossy, where you lose image quality
                   Lossless, where you don't lose image quality
              •   Wherever possible you should use lossy compression, but lossless compression is suffice for larger images
              •   Use EWWW Image Optimizer to compress all the images in your site and all future upload too.
              •   Use  WP-Smush - Image Optimization  to compress all the images in your site and all future upload too.


 #3.  Utilize Caching 

              •   A Cache is something that stores data on the viewer's machine, so future requests for that data can be served faster.
              •   On WordPress, a caching plugin with store your posts and pages as static files so that your server doesn't need to think every time it serves a page
              •   You should use plugins. Here are a few  caching plugins
              •   W3 Total Cache
              •   WP Super Cache
              •   WP Rocket ( premium )
              •   WP Fastest Cache
              •   Hyper Cache


 #4.  GZip Compression 

              •   This is when your server sends your data in a compressed form to your viewer's browser
              •   You can use plugins such as  GZip 
              •   Alternatively, most caching plugins such as W3 Total Cache also offer this


 #5.  Optimize Permalinks 

              •   Instead of using permalinks like 
                      /%category%/%postname&/
                      "http;//wpsohel.blogspot.com/contact"

              •   Use a numerical field such as
                      /%year%/%monthnum%/%postname%/
                      "http://wpsohel.blogspot.com/2015/6/earn-money"


 #6.  Use a content delivery network (CDN) 

              •   A CDN uses several servers around the world to better serve data to your viewer's dependant on their location 
              •   Cached files are then served from these super-fast servers to your viewers to reduce server strain and increase page speed dramatically
              •   This is very easy to incorporate when using servers such as CloudFlare or CDN 
              •   W3 Total Cache also has a function to incorporate a CDN easily 


 #7.  Minify and Combine CSS and Javascript 

              •   Minification of CSS and Javascript is almost like compression. You will remove redundant data such as link beaks and comments and serve a smaller more efficient file
              •   Combining your CSS files and JS files will also reduce the amount of connections a person's browser is required to make
              •   W3 Total Cache providing this service. CloudFlare CDN also offers the ability to combine both internal and external files too.


 #8.  Remove Unused Plugins 

              •   The more plugins that you have, the more strain that your server will undergo when your blog is viewed
              •   Regularly go through and make sure that any plugins that you aren't using are deactivated
              •   If you do plan to use them again, Then delete theme too


 #9.  Reduce Advertisements 

              •   Image-based and flash-based advertisements can put tremendous strain on load time 
              •   Keep these to a minimum
              •   While Google AdSense is served from fast servers, make sure that your ads are loaded Asynchronously use Lazy Loading


 #10.  Lazy loading 

              •   This delays loading of images on your page. 
              •   Images outside of your browsers viewport will not be loaded until a user scrolls to theme
              •   Plugins a3 Lazy Load  offers support for lazy loading HTML5, Flash, and Video Streaming services.
              •   Also  BJ Lazy Load .


 #11.  Reduce Blog Posts Shown 

              •   Instead of forcing your visitor to load 10+ posts on your homepage you should this amount to a more viable amount
              •   Most themes use thumbnails on your homepage so you should try to serve as few images as possible 
              •   Aim to keep to less than 10 on your homepage


 #13.  Reduce Blog Posts Shown 

              •   Instead of forcing your visitor to load 10+ posts on your homepage you should this amount to a more viable amount
              •   Most themes use thumbnails on your homepage so you should try to serve as few images as possible 
              •   Aim to keep to less than 10 on your homepage


 #14.  Optimize Your Database 

              •   You should delete any lingering spam, old, plugin debris, post data from your database
              •   Leaving this data can lead to unnecessary passes when your server is browsing through your database to find a specific piece of data
              •   You can use WP Database Optimizer for this task 
              •   You can use also WP-Optimize for this task